Motte and Bailey Castles - Attack & Defence

Medieval Castle
 

The Norman Strategy of Control, Attack & Defence
William the Conqueror developed a strategy of quickly building a network of wooden Motte and Bailey Castles - he even bought pre-built castles with him when he invaded England - the Battle of Hastings 1066! His objective for constructing the Motte and Bailey castles was to build a network of defence or a springboard for attack! A Motte and Bailey castle could be erected quickly - some only took a couple of weeks! It is believed that as many as 1000 Medieval Motte and Bailey Castles were built in England by the Normans - the Norman strategy for the control, attack and defence of the conquered nation.


Motte and Bailey Castles
Castles Index 
The History of England's Attack & Defence strategy
When the Normans invaded there were very few English Castles - the English had built fortified towns called Burhs but these acted as a safe retreat for the indigenous population - not a base for control, attack and defence. Hillforts had also been constructed and going even further back in time the Romans had built Roman Forts. The speedy construction of so many Motte and Bailey castles enabled the Normans to totally subjugate the English - the perfect vehicles for control, attack and defence.

Motte and Bailey Castles - Attack & Defence

Motte and Bailey Castles Attack & Defence

  • The Normans Motte and Bailey Castles - the art of Attack & Defence
  • Motte and Bailey Castle - How to attack?
  • Motte and Bailey Castle - How to defend?
  • The Motte and Bailey Castle - a network of defence or a springboard for attack!

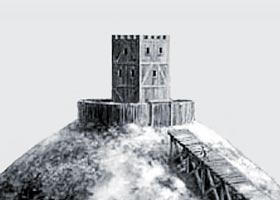
The choice of location of the Motte and Bailey Castle - critical for Control, Attack & Defence
The choice of location of a Motte and Bailey castle was critical for control, attack and defence! Speed of construction of the Motte and Bailey castle was also important to the Invaders. Norman Nobles and Officials covered England to find strategic sites to build the first wooden Motte and Bailey Castles ensuring a ring of bases for the Control, Attack & Defence of their newly acquired country. The sites of the castles followed a pattern covering some, or all, of the following requirements:

  • They made use of existing sites of Roman or Saxon forts and Burhs
  • They were built on the highest ground in the area
  • They often adjoined Rivers
  • They often overlooked Towns
  • They overlooked harbours

It can be seen that the choice of one of the above locations for a Motte and Bailey castle was critical for the Norman strategy of control, attack and defence!

Motte and Bailey Castles - Attack & Defence
Motte and Bailey Castles - The Control, Attack & Defence strategy was as follows:

  • To act as a fortified post from which an attack could be launched or a strong defence could be made
  • To provide a base where men, provisions and horses could be housed
  • To overawe and frighten the indigenous population
  • Motte and Bailey Castles provided a base from which the Normans could govern and control the surrounding district - and launch a strong attack or defence

Motte and Bailey Castles - The Problems of the Attack !
Attacking a Motte and Bailey Castle took courage! The Layout of a Motte and Bailey Castle was full of defensive features! To mount a successful attack would require that the negotiate the following lines of defence would have to be breached:

  • Constant attack from projectiles - arrows and stones etc
    • Negotiate the outer ditch and embankment
    • Storm the gate
    • Negotiate the defence systems and forces within the Bailey
    • Climb, or crawl up, the embankment of the Motte - these were extremely steep and designed so that a horse could not climb it - attack had to be on foot
    • Attack and take the gate of the Motte
    • Storm and capture the Tower
    • And all of the time be under constant attack from various projectiles - arrows and stones etc

Motte and Bailey Castles - Attack Strategy using Fire!
One of the forms of attack was fire! The timber buildings in the Bailey and the Tower itself would burn easily under attack. Having breached the Bailey it would be relatively easy to mount an attack and set the buildings on fire. But taking the Tower was another matter! The Anglo-Saxons had no cavalry and very few archers - an essential for a Motte and Bailey castle attack! Their main weapons used by the Anglo-Saxons were the Danish battle-axe (a two-handed, long-handled battle axe with a heavy chopping head) and a long double-edged sword. Spears and slings were also in use. Fire-arrows would have helped but the Tower was on top of the Motte that could be anything between 50 to 120 feet in height - the range of an arrow was about 90 feet. Huge problem! Hardly any archers and the longbow had not been invented at this time! The English weapons were cumbersome - imagine trying to climb up a really steep, slippery Motte holding a heavy battle axe and a shield with a barrage of arrows and stones raining down on you!

Motte and Bailey Castles - Attack - Siege Strategy!
The other form of attack would be to lay siege to the Motte and Bailey Castle. There were three main ways that a siege attack strategy would work:

  • Negotiate generous terms to persuade the inhabitants to surrender - Not a likely strategy between the Anglo-Saxons and the Normans
  • Treachery - Once again not a likely strategy between the Anglo-Saxons and the Normans
  • Starvation - the most effective strategy! The Normans would however have supplies of food in the Bailey. Lack of water - if the location of the Motte and Bailey Castle did not have access to a water supply

It now becomes very clear why the Norman strategy of building Motte and Bailey castles was so successful - and why the Norman Invasion force of between 5000 and 10,000 maintained their dominance over the whole of the Anglo-Saxon population after winning the Battle of Hastings!

Motte and Bailey Castles - Defence Strategy!
The Motte and Bailey Castles Attack & Defence were used as a fortified post for the Calvary to keep order in the surrounding areas. The castles were intended to intimidate the local population - just the appearance of such a structure resulted in capitulation by the local population. Should a castle be attacked the success in defending the Motte and Bailey Castles depended on how well the castle had been built - the height and the building materials. Their weapons - the number of arrows and the number of soldiers as opposed to the attacking force. Whether the Motte and Bailey Castle could withstand a siege - was there enough food and was there a supply of fresh water?

The Norman Motte and Bailey Castles - Attack & Defence
So started the strategy of the Normans to build castles as their source of power in England. They initiated a programme of constructing more and more - it is believed that nearly one thousand Motte and Bailey Castles were built which were used by the Normans to totally subjugate the English and the Welsh. The scenes illustrated on the Bayeux tapestry, celebrating the Norman victory at the Battle of Hastings, and the eye witness accounts of the chroniclers has provided us with a vast amount of information about the Motte and Bailey castles. We recommend the following site for further details: The Battle of Hastings - 1066. The wooden Motte and Bailey Castles were gradually improved even further and the great fortresses of Medieval England - the great Norman Medieval stone Castles were built.

Motte and Bailey Castles - Attack & Defence

Norman Pre-Built Timber Castles
Motte and Bailey Castles
Motte and Bailey Castle Layout

Famous Motte and Bailey Castles
Life in a Motte and Bailey Castle
Norman Medieval Stone Castles
Norman Castles
Castle Keep
Romanesque Architecture
Motte and Bailey Castles Attack & Defence - Life - Castle - Mot - Baily - Baley - Mots - Mott - Motts - Moat - Moats - Bayley - Defense - Siege - Layout - Picture - Pictures - Plan - Middle Ages - Norman - Life - Attack - Weapons - Defence - Building - Build - Famous - History - Facts - Information - Info - Pictures - Old - Medieval - Mediaeval - Medevil - Medevial - Life - Meadieval - Madieval - Meideval - Medievall - Midieval - Midevil - Mideval - Casttles - Carstles - Cassels - Cassells - Carsels - Defense - Siege - Carsells - Carsels - Carstles - Carsalls - Fortress - Citadel - Court - Donjon - Fasthold - Fort - Garrison - Keep - King - Knight - Mote - Motte - Defend - Weapons - Defense - Siege - Motte and Bailey Castles Attack & Defence - Castle - Mot - Baily - Baley - Weapons - Mots - Mott - Life - Motts - Moat - Moats - Bayley - Layout - Picture - Pictures - Plan - Middle Ages - Defense - Siege - Life - Norman - Life - Attack - Defence - Building - Build - Famous - History - Facts - Information - Info - Pictures - Old - Medieval - Mediaeval - Medevil - Medevial - Meadieval - Madieval - Meideval - Medievall - Midieval - Midevil - Mideval - Weapons - Casttles - Carstles - Cassels - Cassells - Carsels - Carsells - Carsels - Carstles - Carsalls - Fortress - Citadel - Court - Donjon - Fasthold - Fort - Garrison - Keep - King - Knight - Mote - Motte - Defend - White - Life - Castle - Mot - Baily - Baley - Mots - Mott - Motts - Moat - Moats - Defense - Siege - Bayley - Layout - Picture - Pictures - Plan - Middle Ages - Norman - Life - Attack - Defence - Building - Build - Famous - History - Facts - Information - Info - Pictures - Old - Medieval - Mediaeval - Medevil - Medevial - Meadieval - Madieval - Meideval - Medievall - Midieval - Midevil - Mideval - Casttles - Carstles - Cassels - Cassells - Carsels - Carsells - Carsels - Life - Carstles - Carsalls - Fortress - Citadel - Weapons - Court - Defense - Siege - Donjon - Fasthold - Fort - Garrison - Keep - King - Knight - Mote - Motte - Defend - Life
© March 2018 SiteSeen Ltd.Cookies Policy
Privacy StatementBy Linda Alchin